CI/CD
In today’s software development landscape, the ability to iterate quickly is crucial. Deploying new code to production frequently offers several key advantages:
- Fixing bugs promptly as they emerge
- Delivering new features to users regularly
- Responding quickly to user feedback
However, frequent deployment requires well-established processes that both simplify deployment and ensure high-quality code. This need has driven increased focus on continuous integration (CI) and continuous delivery (CD) practices, collectively known as CI/CD.
Continuous Integration
Section titled “Continuous Integration”According to Martin Fowler’s widely accepted definition,
“Continuous Integration is a software development practice where each member of a team merges their changes into a codebase together with their colleagues’ changes at least daily. Each of these integrations is verified by an automated build (including test) to detect integration errors as quickly as possible. Teams find that this approach reduces the risk of delivery delays, reduces the effort of integration, and enables practices that foster a healthy codebase for rapid enhancement with new features.”
Two critical aspects of this definition deserve attention:
Frequent Integration of Changes
Section titled “Frequent Integration of Changes”Under continuous integration, developers regularly incorporate their changes with the rest of the team’s work. In the context of GitHub flow, this means avoiding long-lived feature branches. Instead, developers should:
- Work in small increments
- Frequently merge feature branches into the main branch (through pull requests)
Why integrate frequently? The longer code remains unintegrated, the more likely it diverges from the rest of the codebase, making future integration more difficult (increasing merge conflicts). Frequent integration ensures each merge represents a small, easily reconcilable step. This allows developers to focus on advancing the project rather than struggling to make their code work with the existing codebase.
Automated Testing at Integration
Section titled “Automated Testing at Integration”The second key aspect is building and testing the codebase each time new code is integrated (typically when merging pull requests). This is what most people associate with continuous integration.
Testing code at each integration provides frequent feedback on new changes, helping maintain high code quality. Problems identified early are typically easier to fix.
Modern tooling significantly aids this process, with many platforms designed to automatically run tests at various development stages, even as frequently as every commit.
Continuous Delivery
Section titled “Continuous Delivery”Continuous delivery complements continuous integration. In a robust continuous delivery practice, the software is not only built and tested with each code integration but can also be deployed at virtually any point in its lifecycle, for example, after every merge into the main branch.
The practical implementation of continuous delivery varies based on project size and complexity:
- Some projects implement full automation (continuous deployment), automatically building and releasing to production with each main branch merge
- Other projects may not automate the final deployment step but maintain an automated pipeline where releases can be deployed with minimal manual intervention (“push-button” deployment)
Like frequent integration, frequent deployment reduces the size of each release, minimizing risk and increasing deployment velocity.
Automating as much of the deployment process as possible reduces repetitive overhead and minimizes the chance of human error during deployment.
As projects grow in size and complexity, Google’s Software Engineering team recommends additional strategies:
- Feature Flags: Simple configuration settings that can toggle specific features on or off within the deployed application, providing granular control over feature visibility and timing.
- Staged Rollouts: Releasing features gradually to increasing percentages of users (e.g., canary deployments), which
- Makes bug resolution more manageable (affecting fewer users initially)
- Ensures adequate infrastructure capacity for new features
- Data-Driven Deployment: Using metrics to guide deployment decisions, such as A/B testing where different user groups experience different versions of the product while performance data is collected.
Modern tooling continues to evolve to support these CI/CD practices, making them increasingly accessible to development teams of all sizes.
Building a CI/CD Pipeline with GitHub Actions
Section titled “Building a CI/CD Pipeline with GitHub Actions”GitHub Actions provides a powerful way to implement CI/CD directly within your GitHub repository. While many excellent tools exist for creating CI/CD pipelines (such as Jenkins, Travis CI, or CircleCI), GitHub Actions offers seamless integration with your GitHub repositories.
GitHub Actions is a platform for automating workflows triggered by events in your GitHub repository. While it supports many automation scenarios (from welcoming new contributors to security scanning), we’ll focus on its popular CI/CD capabilities.
Key Components of GitHub Actions
Section titled “Key Components of GitHub Actions”Here are the key components of a GitHub Actions workflow:
Workflows
Section titled “Workflows”Workflows are automated processes triggered by specific events in your GitHub repository, such as:
- Code pushes to specific branches
- Pull request creation or updates
- Issue comments
- Scheduled times
- Manual triggers
Jobs and Steps
Section titled “Jobs and Steps”Each workflow consists of:
- Jobs: Individual units of work that run in their own virtual environment
- Steps: Individual tasks within a job that perform specific actions
Jobs can be configured to run:
- In parallel (simultaneously)
- Sequentially (with dependencies)
Runners
Section titled “Runners”Every job executes in its own virtual machine called a runner. GitHub provides hosted runners for:
- Linux
- macOS
- Windows
You can also set up self-hosted runners for custom environments.
Actions
Section titled “Actions”Steps within jobs can execute:
- Shell commands
- Actions: Reusable units that perform specific tasks
You can use actions from:
- The GitHub Marketplace (community-created)
- Your own custom-built actions
Workflow Structure
Section titled “Workflow Structure”A GitHub Actions workflow is defined in YAML format and looks something like this:
name: <name_of_your_workflow>
on:  <event_1>:    branches: <list_of_branches>  <event_2>:    branches: <list_of_branches>
jobs:  <first_job_name>:    runs-on: <runner_type>    steps:      - uses: <action_name>@<version>      - name: <name_of_step>        uses: <action_name>@<version>        with:          <dependency_name>: <dependency_value>      - name: <name_of_step>        run: <shell_command>      - name: <name_of_step>        run: <shell_command>
  <second_job_name>:    needs: <first_job_name>    runs-on: <runner_type>    steps:      - uses: <action_name>@<version>      - name: <name_of_step>        run: <shell_command>
All the text in angle brackets (<...>) should be replaced with your specific values.
flowchart LR
    subgraph events
        direction TB
        event1
        event2
    end

    subgraph runner1
        direction TB
        subgraph job1
            direction TB
            R1S1[step1]
            R1S2[step2]
            R1S3[step3]
            R1S4[step4]
            R1S1 --> R1S2 --> R1S3 --> R1S4
        end
    end

    subgraph runner2
        direction TB
        subgraph job2
            direction TB
            R2S1[step1]
            R2S2[step2]
            R2S1 --> R2S2
        end
    end

    events -->|trigger| runner1 --> runner2
This structure demonstrates a basic CI/CD pipeline that builds and tests code on every push or pull request to the main branch, and deploys to production when changes are merged to main.
The syntax and approach for CI/CD workflows can be applied to virtually any automation task with GitHub Actions. Refer to the GitHub Actions documentation to expand on these concepts.
Setting Up Our application
Section titled “Setting Up Our application”Let’s go back to our local todo application. Before we can set up a CI/CD pipeline, we need to ensure our application has all the necessary scripts and configurations in place.
The repository has a cicd branch that has Playwright setup with a few end-to-end tests. The following npm scripts are configured:
npm run build- Builds the app into abuild/directorynpm run preview- Starts a local server to preview the appnpm run test:e2e- Runs headless Playwright E2E tests
Playwright is configured to run a local server with npm run preview and run the tests against it. The tests are located in the e2e/ directory.
Notice that while Vitest was setup in the branch, we haven’t written any unit or integration/components tests (the app is so simple that it’s actually hard to do).
Alternatively, you can start from the code written in the lectures on end-to-end testing with Playwright.
Writing an Integration Workflow
Section titled “Writing an Integration Workflow”Let’s explore how to create a simple GitHub Actions workflow that automatically builds and tests your application when code is pushed to your repository.
All GitHub Actions workflows are defined in YAML files located in the .github/workflows/ directory (note the leading dot). Let’s create our first workflow file:
name: Build and test
on: [push]
jobs:  build-and-test:    runs-on: ubuntu-latest    steps:      - uses: actions/checkout@v4      - uses: actions/setup-node@v4        with:          node-version: 22      - run: npm ci      - run: npm run build      - run: npx playwright install --with-deps      - run: npm run test:e2e
YAML is similar to JSON, allowing you to create structured data. Here’s a breakdown of our workflow components:
name: Provides a display name for the workflow in the GitHub Actions UIon: Specifies which events trigger the workflow (in our case, anypushto any branches)jobs: Contains all the jobs this workflow will run
The steps section contains a series of actions to be executed in order. Each step can either use an action (with uses) or run a shell command (with run). The with keyword is used to pass parameters to actions.
For comparison, here’s how this structure would look in JSON:
{ "name": "Build and test", "on": ["push"], "jobs": { "build-and-test": { "runs-on": "ubuntu-latest", "steps": [...] } }}Our workflow consists of several steps:
- Checkout code: Uses
actions/checkout@v4to clone your repository - Setup Node.js: Uses
actions/setup-node@v4to install Node.js v22 - Install dependencies: Runs
npm ci(clean install, preferred for CI environments) - Build application: Runs
npm run build - Install Playwright dependencies: Runs
npx playwright install --with-depsto install Playwright and its dependencies - Run E2E tests: Runs
npm run test:e2e
Once committed to GitHub, your workflow will run automatically on new pushes. You can monitor it through a status icon next to commit hashes:
- 🟡 Yellow dot: Currently running
- ✅ Green checkmark: Successfully completed
- ❌ Red X: Failed
Click on the status icon for details, or visit the “Actions” tab in your repository to see all workflow runs.


Saving Workflow Artifacts
Section titled “Saving Workflow Artifacts”GitHub Actions workflows often generate important files or outputs that you may want to preserve after the workflow completes. These artifacts can include build outputs, test results, or debugging information.
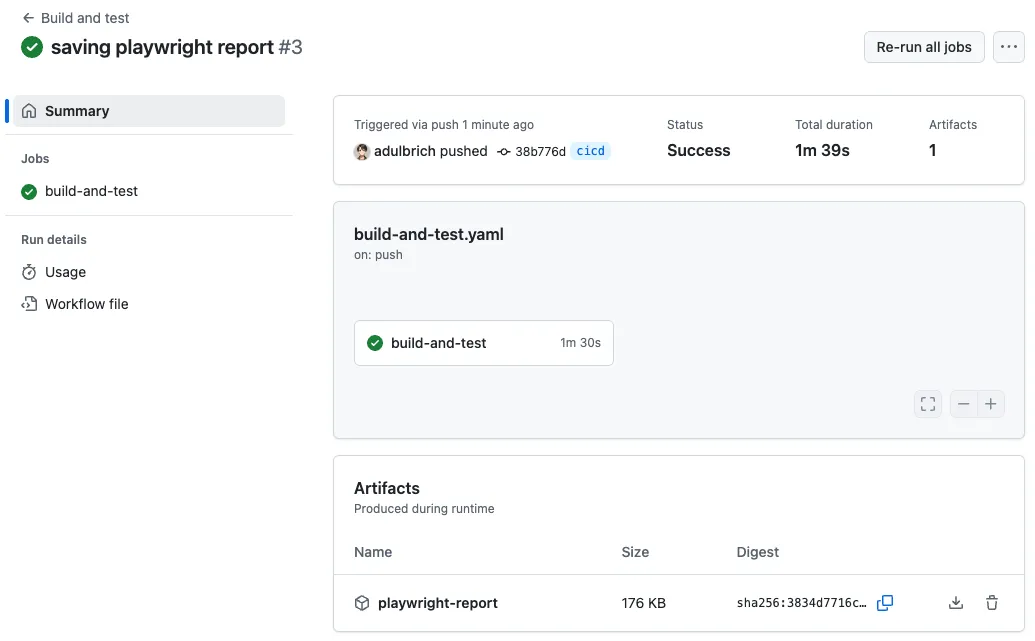
For example, in our “Build and test” workflow, we might want to save the report of our end-to-end tests, particularly to help diagnose failing tests.
GitHub Actions makes this simple with the official upload-artifact action available in the GitHub Actions Marketplace.
steps: # ...previous steps (checkout, setup, build, browsers, test) - uses: actions/upload-artifact@v4 if: ${{ !cancelled() }} with: name: playwright-report path: playwright-report/ retention-days: 30This step requires two key parameters:
name: A descriptive identifier for the artifactpath: The location of files to upload relative to the repository root
After pushing this updated workflow to GitHub, the Playwright report will be automatically stored when the workflow runs. To access these artifacts:
- Navigate to the “Actions” tab in your GitHub repository
- Select the workflow name from the sidebar
- Choose the specific workflow run you’re interested in
- Scroll to the bottom of the workflow details page
Artifacts will be listed at the bottom of the page with download links. Click on any artifact to download it.
Beyond just storing test evidence, artifacts serve multiple purposes in your CI/CD pipelines:
- They can be downloaded and used by other jobs in the same workflow
- They can be shared between different workflows
- They provide a way to preserve important outputs for debugging or documentation
This capability becomes especially valuable in more complex workflows where outputs from one process serve as inputs to another.
Reusable Workflows
Section titled “Reusable Workflows”When preparing to deploy our application using GitHub Actions, we need a well-structured approach that allows for both testing and building before deployment. Instead of duplicating steps across multiple workflows, GitHub provides a mechanism for creating reusable workflows.
We need to consider two important requirements:
- Separate testing from deployment: We want to test all code pushes, but only deploy when changes reach the
mainbranch - Avoid code duplication: Repeating the same build and test steps across different workflows increases maintenance burden
To make our “Build and test” workflow reusable, we need to modify the triggering event:
name: Build and test
on:  workflow_call:   # This makes the workflow callable from other workflows
jobs:  # ...existing job configuration remains unchanged
By changing the trigger from push to workflow_call, we’ve transformed this workflow into a component that can be invoked from other workflows.
Since our reusable workflow no longer runs directly on code pushes, we need a new workflow to handle that event:
name: Test pushed code
on:  push
jobs:  build-and-test:    uses: ./.github/workflows/build-and-test.yaml
This new workflow file:
- Runs whenever code is pushed to any branch
- Contains a single job that calls our reusable “build and test” workflow
When these changes are committed and pushed, the testing process will continue to work exactly as before. The difference is that now our build and test process is modularized, making it available for use in our future deployment workflow without duplicating code.
Deploying Our Application
Section titled “Deploying Our Application”Now that our “build and test” workflow is reusable, let’s create a workflow to deploy our application to GitHub Pages whenever code is pushed to the main branch.
When deploying to GitHub Pages, GitHub will deploy our application on the following URL by default: https://<username>.github.io/<repository>/
In many modern frameworks, internal routing happen at the root level (e.g., /about), which can cause issues when deployed to GitHub Pages. To address this, we need to set the BASE_PATH environment variable to the repository name. This will ensure that our application correctly handles routing. Our local todo application is already configured to use the BASE_PATH environment variable (incl. in the Playwright config).
First, we need to modify our “build and test” workflow to make the build output available for deployment. We’ll add an optional input parameter that controls whether the build is stored as an artifact:
name: Build and test
on:  workflow_call:    inputs:      upload-pages-artifact:        type: boolean        required: false
jobs:  build-and-test:    runs-on: ubuntu-latest    steps:      # ...previous steps      - run: npm run build        env:          BASE_PATH: '/${{ github.event.repository.name }}'      # ...previous steps      - if: ${{ inputs.upload-pages-artifact }}        uses: actions/upload-pages-artifact@v3        with:           path: build/
Our workflow_call now accepts an optional input parameter called upload-pages-artifact. This parameter is a boolean that defaults to false. If set to true, the build output will be uploaded as an artifact.
Our build step now also sets the BASE_PATH environment variable to the repository name. This ensures that our application is built with the correct base path for routing.
Our step to upload the artifact uses the actions/upload-pages-artifact@v3 and only runs if the upload-pages-artifact input is set to true.
Now let’s create a new workflow file for deployment:
name: Deploy to GitHub Pages
on:  push:    branches: [ main ]
jobs:  build-and-test:    uses: ./.github/workflows/build-and-test.yaml    with:      upload-pages-artifact: true
  deploy-to-pages:    needs: build-and-test    runs-on: ubuntu-latest    permissions:      pages: write      id-token: write    environment:      name: github-pages      url: ${{ steps.deployment.outputs.page_url }}    steps:      - uses: actions/configure-pages@v5      - uses: actions/deploy-pages@v4        id: deployment
In this workflow:
- We call the reusable “build and test” workflow and set the
upload-pages-artifactinput totrue. This ensures that the build output is available for deployment. - The
deploy-to-pagesjob runs after thebuild-and-testjob completes successfully. It uses theactions/configure-pages@v5action to configure the deployment settings for GitHub Pages. This action sets up the necessary environment variables and permissions for the deployment. - The
deploy-to-pagesjob also requires thepagesandid-tokenpermissions to write to GitHub Pages. - Finally, the
actions/deploy-pages@v4action is used to deploy the build output to GitHub Pages. Theidof this step is set todeployment, allowing us to reference the deployment URL in the environment variable.
The environment section specifies the environment name (github-pages) and the URL of the deployed site, which is obtained from the deployment step’s output.
Before this workflow can succeed, you’ll need to update your repository settings:
- Navigate to your repository on GitHub
- Go to Settings → Pages
- Change the “Source” setting to “GitHub Actions”
To avoid running the build and test process twice when pushing to main, let’s update our initial workflow to run only on pull requests:
name: Test PRs
on:  pull_request
jobs:  build-and-test:    uses: ./.github/workflows/build-and-test.yaml
With this change:
- Pull requests will be tested through this workflow
- Pushes to main will be tested and deployed through the deployment workflow
- We avoid redundant processing
As a final enhancement, you could set up a branch protection rule requiring the “Test pull requests” workflow to pass before pull requests can be merged into main.
Improving the Workflow Speed
Section titled “Improving the Workflow Speed”While running our build and test workflow, you might notice that the step to install Playwright browsers takes a while. This is because the workflow installs the browsers and dependencies every time it runs.
Playwright provides a Docker container that includes all the necessary browsers and dependencies. By using this container, we can significantly speed up our workflow.
In our build-and-test.yaml workflow, we can add our container configuration and remove our Playwright installation step:
name: Build and test
on:  workflow_dispatch:  workflow_call:    inputs:      upload-pages-artifact:        type: boolean        required: false
jobs:  build-and-test:    runs-on: ubuntu-latest    container:      image: mcr.microsoft.com/playwright:v1.52.0-noble      options: --user 1001    steps:      - uses: actions/checkout@v4      - uses: actions/setup-node@v4        with:          node-version: 22      - run: npm ci      - run: npm run build        env:          BASE_PATH: '/${{ github.event.repository.name }}'      - run: npx playwright install --with-deps      - run: npm run test:e2e      - if: ${{ !cancelled() }}        uses: actions/upload-artifact@v4        with:            name: playwright-report            path: playwright-report/            retention-days: 30      - if: ${{ inputs.upload-pages-artifact }}        uses: actions/upload-pages-artifact@v3        with:           path: build/
The container section specifies the Docker image to use for the job. The image field points to the Playwright container, and the options field sets the user ID to 1001, which runs the container as a non-root user (for security purposes).
Code Scanning and Security
Section titled “Code Scanning and Security”While we already discussed best practices regarding code reviews and branch protections, and we’ll discuss linting in the next section, there are additional security features available in GitHub that can help you identify and fix vulnerabilities in your code.
By embedding security checks into CI/CD, we catch issues early, reduce manual effort, and maintain trust in our applications.
Code Scanning with CodeQL
Section titled “Code Scanning with CodeQL”CodeQL is GitHub’s static analysis tool for identifying security vulnerabilities and code quality issues. It treats code as data, allowing you to query it for patterns that indicate potential problems. CodeQL supports JavaScript (and TypeScript), making it perfect for analyzing Node.js applications, React frontends, or Express servers.
Manual code reviews can miss subtle vulnerabilities, like SQL injection or cross-site scripting (XSS). CodeQL automates this process, scanning code for known vulnerability patterns and integrating results into your CI/CD pipeline. This ensures that every pull request or commit is checked before deployment.
You can enable CodeQL scanning in your repository by following these steps:
- Go to your repository on GitHub
- Click on the Settings tab
- Click on Advanced Security
- Go to the Code Scanning section and setup CodeQL analysis
You can select the default configuration or customize it to suit your needs. The latter will allow you to configure a workflow that runs CodeQL analysis, tailored to your specific codebase.
Here’s an example. Assume we have a Node.js Express application with a vulnerable endpoint:
const express = require('express');const app = express();
app.get('/user', (req, res) => {  const username = req.query.name;  // Vulnerable to XSS: Directly embedding user input in response  res.send(`Hello, ${username}`);});
Let’s go ahead and add a CodeQL workflow to our repository through the “Advanced” code scanning setup. This will create a new workflow file in the .github/workflows/ directory (default comments removed for clarity, refer to GitHub for the original file):
name: "CodeQL Advanced"
on:  push:    branches: [ "main" ]  pull_request:    branches: [ "main" ]  schedule:    - cron: '32 17 * * 2'
jobs:  analyze:    name: Analyze (${{ matrix.language }})    runs-on: ${{ (matrix.language == 'swift' && 'macos-latest') || 'ubuntu-latest' }}    permissions:      # required for all workflows      security-events: write
      # required to fetch internal or private CodeQL packs      packages: read
      # only required for workflows in private repositories      actions: read      contents: read
    strategy:      fail-fast: false      matrix:        include:        - language: actions          build-mode: none        - language: javascript-typescript          build-mode: none    steps:    - name: Checkout repository      uses: actions/checkout@v4    - name: Initialize CodeQL      uses: github/codeql-action/init@v3      with:        languages: ${{ matrix.language }}        build-mode: ${{ matrix.build-mode }}    - if: matrix.build-mode == 'manual'      shell: bash      run: |        echo 'If you are using a "manual" build mode for one or more of the' \          'languages you are analyzing, replace this with the commands to build' \          'your code, for example:'        echo '  make bootstrap'        echo '  make release'        exit 1
    - name: Perform CodeQL Analysis      uses: github/codeql-action/analyze@v3      with:        category: "/language:${{matrix.language}}"
This workflow:
- Triggers on push or pull requests to the main branch. and on a schedule (at 17:32 UTC every Tuesday).
- Checks out the code, initializes CodeQL, and analyzes Actions and JavaScript files.
- Reports findings in the GitHub UI under the “Security” tab.
- Runs on Ubuntu by default, but uses macOS for Swift code analysis.
- Sets the specific permissions the workflow needs:
security-events: write: To write security scanning resultspackages: read: To access CodeQL packagesactions: read and contents: read: For accessing repository content
- Uses a matrix strategy to scan multiple languages in parallel:
- GitHub Actions workflows (YAML files)
- JavaScript/TypeScript code
- Both use “none” build mode, meaning CodeQL will automatically figure out how to analyze the code
Running this workflow will analyze your code and report any vulnerabilities or issues it finds. You can view the results in the “Security” tab of your repository. It will report something along the lines of:
Directly writing user input (for example, an HTTP request parameter) to an HTTP response without properly sanitizing the input first, allows for a cross-site scripting vulnerability.
Dependencies
Section titled “Dependencies”Dependabot is GitHub’s tool for managing dependencies by automatically updating them and flagging vulnerabilities. In JavaScript projects, where package.json files list dependencies like express or lodash, outdated or vulnerable dependencies are a common attack vector.
A single vulnerable dependency can compromise your application. For example, an old version of lodash might allow prototype pollution attacks. Dependabot scans your dependencies, checks them against vulnerability databases, and optionally creates pull requests to update them.
You can enable dependencies scanning in your repository by following these steps:
- Go to your repository on GitHub
- Click on the Settings tab
- Click on Advanced Security
- Go to the Dependabot section and enable Dependabot
You can configure a custom workflow for Dependabot.
Secrets
Section titled “Secrets”Secret scanning detects sensitive information (e.g., API keys, passwords) in your code, commits, or pull requests. In JavaScript projects, secrets often appear in configuration files or environment variables, like a .env file or hardcoded API keys.
Leaking secrets can lead to unauthorized access to your systems. For example, a hardcoded AWS key in a public repository could allow attackers to spin up costly resources. GitHub’s secret scanning automatically identifies and protects secrets, preventing exposure (for supported partners).
Secret scanning is enabled by default for public repositories on GitHub. For private repositories, enable it under the repository’s Settings tab then Advanced Security section.
If a secret is detected, take these steps:
- Rotate the secret: Invalidate the exposed key and generate a new one.
- Remove the secret: Delete the hardcoded value and use environment variables.
If you need to store secrets in your repository, use GitHub Secrets. These are encrypted environment variables that can be accessed in your workflows without exposing them in the code.
Container Scanning
Section titled “Container Scanning”While we haven’t discussed containers in this course yet, they are a common deployment method for modern applications. Containers package applications and their dependencies into isolated environments, ensuring consistent behavior across different systems.
Container scanning identifies vulnerabilities in container images. This is crucial for applications that rely on Docker or other container technologies, as vulnerabilities in base images can compromise the entire application.
One common tool for container scanning is Trivy, an open-source vulnerability scanner for containers. It scans images for known vulnerabilities and provides detailed reports.
Dynamic Scanning
Section titled “Dynamic Scanning”Dynamic Application Security Testing (DAST) tests your application while it’s running, simulating real-world attacks to identify vulnerabilities. This is particularly useful for web applications, where user input can lead to security issues.
Dynamic scanning tools like ZAP can automatically crawl your application and identify vulnerabilities like SQL injection, cross-site scripting (XSS), and insecure configurations.
These tools can be integrated into your CI/CD pipeline to ensure that security testing is part of your development process. For example, you can set up a GitHub Actions workflow that runs a dynamic scanner against your application after it has been deployed to a staging environment.
In the example below, we run our application against the live version of our application. This is a simple example, but you can customize it to suit your needs.
name: DAST with OWASP ZAPon: push: branches: [main]jobs: zap-scan: runs-on: ubuntu-latest steps: - uses: zaproxy/action-baseline@v0.14.0 with: target: https://cs362.alexulbrich.com fail_action: trueLocal CI with Hooks
Section titled “Local CI with Hooks”What if you automate tests or other tasks locally before pushing to GitHub? This can help catch issues early and ensure that your code is always in a deployable state.
Git hooks are scripts that run automatically at certain points in the Git workflow. They can be used to enforce coding standards, run tests, or perform other tasks before code is committed or pushed.
Hooks can run at various stages in the Git workflow, including:
pre-commit: Runs before a commit is createdpre-push: Runs before code is pushed to a remote repositorypost-commit: Runs after a commit is createdpost-checkout: Runs after a branch is checked outpost-merge: Runs after a merge is completed
The easiest way to manage Git hooks is to use a tool like Lefthook or Husky. These tools allow you to define hooks in a configuration file and automatically install them in your Git repository.
Lefthook is simpler to get started. It uses a YAML configuration file to define hooks and can run tasks in parallel.
To set up Lefthook in your project, follow these steps:
-
Install Lefthook as a development dependency:
Terminal window npm install lefthook --save-dev -
Create a
lefthook.ymlfile in the root of your project. Here’s a simple example that works with our application:pre-push:jobs:- run: npm run build- run: npm run test:e2epre-commit:parallel: truejobs:- run: npm run format- run: npm run lintThis configuration runs
npm run lintandnpm run formatin parallel before each commit, andnpm run buildandnpm run test:e2ebefore each push. These scripts have all been defined in ourpackage.jsonfile. -
Initialize Lefthook in your project:
Terminal window npx lefthook install
Now every time you commit, Lefthook will run the specified tasks. If any of the tasks fail, the commit will be aborted, allowing you to fix the issues before pushing your code. Same applies for the pre-push hook.
If you use the commit and push commands in your IDE, Lefthook will automatically run the hooks for you, but you won’t see the output in the terminal. If you use the terminal, Lefthook will run the hooks and show you the output in the terminal.
Linting and Formatting
Section titled “Linting and Formatting”Linting and formatting are essential practices in modern software development. They help maintain code quality, readability, and consistency across a codebase. In this section, we’ll explore how to set up linting and formatting for our application using ESLint and Prettier, respectively.
A promising alternative to both ESLint and Prettier is Biome, which combines linting, formatting, and type checking into a single tool. It is designed to be fast and efficient, making it a great choice for modern JavaScript and TypeScript projects.
When working on a project, having a consistent code style is crucial for collaboration and maintainability. Linting and formatting tools help enforce coding standards and best practices, making it easier for developers to read and understand each other’s code.
Linters analyze your code to detect:
- Potential bugs or errors
- Problematic patterns
- Security vulnerabilities
- Code that doesn’t follow best practices
- Unused variables or imports
- Deviation from project-specific rules
Linters often provide suggestions but primarily focus on identifying issues rather than automatically fixing them, though many modern linters do offer auto-fix capabilities for certain problems.
Formatters focus exclusively on code style and make automatic changes to enforce consistent formatting:
- Indentation
- Line length
- Spacing
- Bracket placement
- Quote style
- Line endings
Formatters are opinionated and automatically rewrite your code to match a specified style, with minimal configuration options.
All languages have their own linters and formatters, but in the JavaScript ecosystem, ESLint and Prettier are the most popular choices.
The crucial point is that you want the whole team to agree on a single set of rules for both linting and formatting. If you don’t, you might end up with many diffs in your pull requests that are just formatting changes, making it harder to review the actual code changes.
Most of the time, your linter and formatter options will be configured in your repository and shared among all developers.
To enforce it consistently, you can use a pre-commit hook to run the linter and formatter before each commit. This ensures that all code added to our git history adheres to the same standards.
Building and Testing
Section titled “Building and Testing”Making sure your application builds and passes all tests before pushing it to the remote (where it might go through another set of tests and be deployed) is a good practice. This can be done using Lefthook, as we saw before.
In our example, we set up a pre-push hook that runs npm run build and npm run test:e2e before each push. This ensures that the code being pushed is always in a deployable state.
It’s very common to run unit tests in pre-commit hook if the test suite is fast enough. If you have a large test suite, you might want to run only a subset of tests (e.g., the ones that are affected by the changes).
As always, the tests you run (types, number, frequency) depends on many factors. You might prioritize developer experience and run your tests only in remote CI/CD (if they take too long), or you might prioritize code quality and run them locally before every commit, or you find a balance between the two.
Additional resources
Section titled “Additional resources”- Continuous Integration in Software Engineering at Google
- Continuous Delivery in Software Engineering at Google
- CI/CD Explained: The DevOps Skill That Makes You 10x More Valuable by TechWorld with Nana
- Devops is Terrible by ThePrimagean, reflecting on DevOps is Bullshit.
- Static Analysis in Software Engineering at Google
- Dependency Management in Software Engineering at Google